
If you are frugal, busy or just like the DIY ethos in general, then you really don’t have to go to the barber.
How can you get a professional style haircut at home? By using the best self haircutting tools that even a professional would use.
Of course, using the best professional hair cutting scissors and other tools only gets you halfway there, you also need to learn how to cut your own hair.
For the sake of brevity and focus, I will only go into the tools you need to cut your hair at home, so if you’re looking for a tutorial, then click that link to go to the full article.
A Helpful Guide on the Best Hair Cutting Tools
Before I get into the reviews of the best self hair cutting tools, let me give you two bits of advice.
To really understand what tools you need for your hair cut at home, you should go to a barber and watch them. A busy shop is a good one visit for two reasons. One is that they are busy because they obviously know what they are doing so you will get a professional tutorial just by watching. The other benefit is that while you wait, you can watch a variety of haircuts being done.
This will help you get an idea of the tools used, how to use them and what they are best for. Consider it a crash course in how to cut your own hair for the cost of a haircut.
The second bit of advice is to plan things out ahead of time. Think about what kind of haircut you want and not just to wing it. By having an idea in mind you’re giving yourself a better shot at things coming out better. It doesn’t matter how good the tools are if you don’t know what to do with them so keep that in mind.
With that, let’s dive into the essential products you need to get started.
First things first. Before you buy any self hair cutting tools, you need to be set up for success with the peripherals.
First and foremost is a three way mirror. Since you can’t see the sides of your head, you need the mirror to give you visual access.
Looking straight ahead at a mirror can only get you so far. This is especially necessary if you plan to do any kind of taper or fade so there are no lines left around your head.
To get a good self hair cutting blend in you can’t just wing it and hope for the best.
If you can get a mirror with lights, then that is even better since shadows will play games with you.
Another good idea is to have a hand mirror so you can see the back of your head, too.
Koolorbs Vanity Mirror
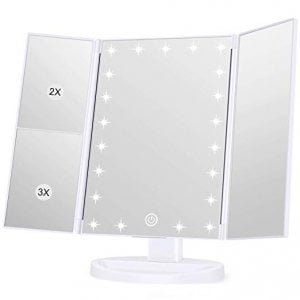
It has so much functionality that makes it really easy to see what you are doing.
The left flank of the mirror has 2 zoom mirrors to get 2x and 3x as close so you can see all the details.
The lights will help keep the shadows away and then the fact that it can be rotated 180° means it is very versatile.
In my opinion, this sets it apart in a big way. Yes, the Self Cut System takes up less space, but if you want a good home DIY haircut then it is definitely worth it to go for something with more helpful features. Besides, this also costs a fraction of what the Self Cut System costs.
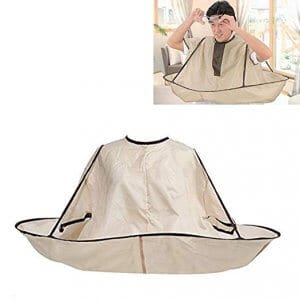
EWIN Hair Cutting Cloak Umbrella Cape
Here’s the thing:
One of the worst parts about self hair cutting at home is the clean up. It can be such a pain that it is almost worth it to just spend the money at a barber to avoid the hassle. I often cut my son’s hair at home and end up finding stray hairs around for days. It’s annoying.
Having an umbrella cape takes all of that away and makes it super easy to keep your home tidy when cutting your hair.
The idea is nothing new so there are a lot of versions out on the market but I like this style best.
You’ll notice where the ledge is located, almost at the waist. This is ideal as it won’t interfere with your hands and get in the way. If you have seen the one that has the ledge at shoulder level, I would say to avoid that one. It might work when you’re using it on somebody else, but to use it on yourself is a no go. You’ll be constantly frustrated at how it gets in the way and how you have to angle your arms to get around it. That does not make it easy to cut your own hair.
The other thing I like is the type of nylon is very smooth. This lets the hair slide down neatly into the ledge without sticking to the sides. You don’t want hair getting stuck to this thing as then it makes a mess as you are trying to clean it up.
The downsides to this one though is it can be hard to fold back up to put it in the storage bag. Though, if you ever use those two second tents that open up as soon as you open the bag then you already know how to deal with this one. You have to fold it into loops to get it back.
EDGUP – Neckline Shaving Template
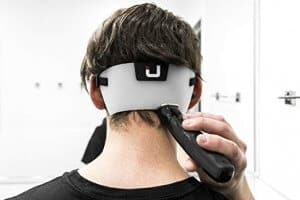
The area at the back of the neck can look quite messy when left alone, or worse, have a crooked or uneven line. Even when you can see what you are doing by using a three way mirror, it is still hard to angle your hand just right and also have to do things in reverse since things will be the opposite in a mirror.
Previously, the only way to effectively do this at home was to have your friend or wife do it for you. And even then it wouldn’t be guaranteed to come out looking good.
The best thing to do is take it into your own hands and use this template.
It is so easy to use as once it is in place then you’re simply running a razor or trimmer around the edge.
Even if you don’t always want to do a full haircut, this will give you a nice clean up for in between cuts. When you feel like the edges are looking ragged but you like the length of your hair, just give yourself a neck clean up and in a few minutes you’re on your way.
Flowbee Vacuum Clipper
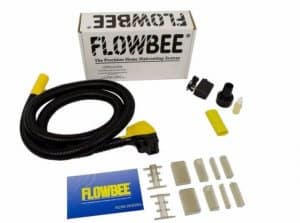
Though the Flowbee never went away, people kind of forgot about it. With more and more people looking to save money, it makes sense that it is enjoying a bit of a renaissance.
It is so easy to use whether you are doing a buzz cut or single length all the way around, or even if you are doing a taper cut since it has different length spacers.
Pair it with the neckline template and you have a cheap and efficient way to cut your hair.
The best part? There is no clean up. The clippings get sucked right up into the vacuum so you don’t have to lift a finger to sweep or vacuum the floor. You won’t even have cut hair falling off of your head and getting into your collar making you itchy. It’s a win win all around.
If you want to get a deeper understanding of how it works and whether it is worth it for you then check out our detailed review of the Flowbee.
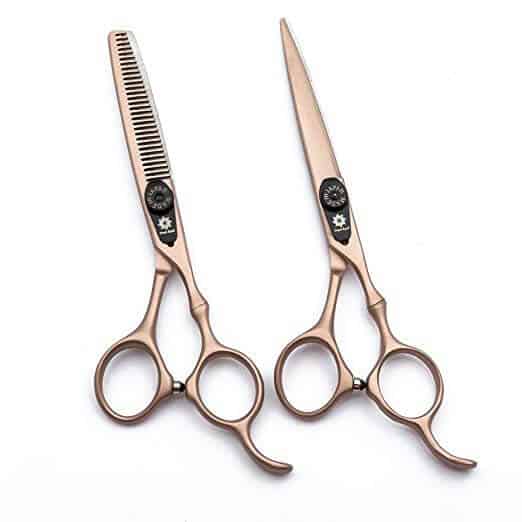
Professional Hair Cutting Scissors
The items in the last section will all make your life quite a bit easier and allow you to do a better job at cutting your own hair. You just won’t see any in a professional setting.
When you want to cut your own hair like a pro then you need to use tools like the best hair cutting scissors that a barber would use, among other things.
You may be tempted to get any old scissors, but to really do a great looking professional haircut yourself then you need the best hair cutting scissors a barber or stylist would use.
Dream Reach are professional grade and made with the highest quality japanese steel. Yet, they don’t cost nearly as much as you would expect to pay. I typically end up spending a few hundred for scissors. Well, in the biz we call them shears. Anyway, I spend that much as I need something that can handle a hundred or more haircuts per week.
Since you’re only focusing on your own head maybe a couple of times a month then these are more than good enough and will last you years.
They hold their edge and stay sharp after many years of haircuts at home.
Something that happens a lot with cheap scissors is the hair often gets bent in between the blades. That never happens with these professional hair cutting scissors.
As a bonus, you get a pair of thinning shears to help take the bulk out of thick hair. They can also be used to erase the line that sometimes happens when going from clippers to scissors on the crown of the head.
What I like about these is how they are adjustable by using a dial on the side. Everybody has their own preference on how tight they should be so the best hair cutting scissors are able to be adjusted on the fly.
At 6 inches, they are a pretty good size for just about anybody. I will say, though that I prefer to use 7 inch and most barbers do as well. As an at-home hair cutter, you may want to go with the shorter length. In fact, 6 inches may be a bit too long for the inexperienced.
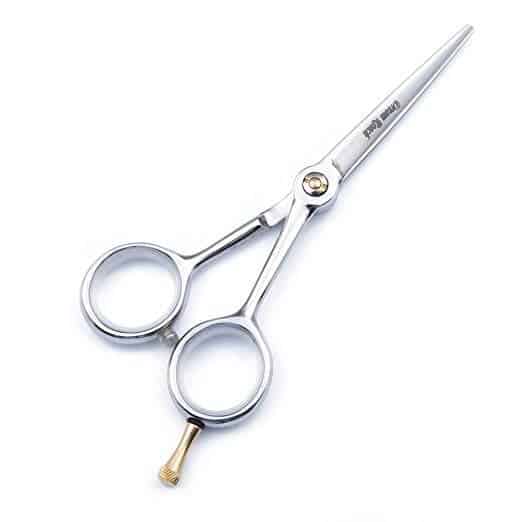
These may not be the best hair cutting scissors ever made, but for the price and for the job you asking them to do, they are really highly rated.
The nice thing is they can do double duty for other jobs too like trimming a beard or mustache.
For a more in depth read on the best scissors and thinning shears then click the link for the full article.
How to Cut Your Own Hair With Scissors
You may have gone out and bought the best hair cutting scissors but if you don’t know how to use them then you wasted your money.
Take a few of these tips to heart and see your haircuts get much better!
Wash Your Hair
Clean hair is key when you are using shears to cut your hair. You don’t need to do anything special, just wash your hair as normal and towel dry.
Don’t try it completely as leaving it a bit wet will make it easier to handle and cut.
If your hair is long then you may want to add some leave in conditioner to keep it feeling wet and smooth for longer.
Keep a spray bottle with water nearby. If you are a beginner at this then it may take a while which will see your hair dry out a bit. You need to keep it damp so spray it you feel it drying out.
Comb Out the Tangles
Before you begin cutting, comb out any of the tangles and start to section it.
Sectioning the hair means combing away the area that you aren’t about to cut and leave small sections of the part you will cut. This will make sure you are cutting all of your hair evenly.
Use Your Fingers
When you have your hair sectioned, take some in between your fingers and pull it straight. Then pull it down into your fingers until you are only leaving the amount that you want to cut above your fingers.
The first section you cut will act like a guideline. Once this is cut then when you go to the next section you’ll use the cut area to guide your fingers to the right length.
Do this from side to side and then work your way back in sections to the back of the head.
Work slowly so you are as accurate as possible.
Dry It to Check
Now you’ll want to see if the length is correct. Keep in mind that your hair will shrink about 30% when it dries, so if it is wet and you think it needs to go shorter, then dry it to see before you continue to cut.
Blow dry it and check for any uneven spots. You can spritz that one area to cut it down so you don’t have to wet your whole head again. If you see a lot of scissor cuts and uneven spots then you may want to wet your head down and go over the entire area.
What you are looking for is a smooth cut where you can’t see any of the evidence of the cuts. Everything should be uniform.
Final Thoughts
Even without any formal training, you should be able to do a professional looking cut at home yourself. Self hair cutting does take trial and error though. Unfortunately, that generally means making mistakes on your own head as you learn!
With the right tools and some patience, you can look sharp and keep more of your hard earned money in your pocket.
Do you have any questions about essential hair cutting tools? As a barber, I have tried them all so I am happy to help you find the right ones for use at home, too.
Just drop a line in the comment box below and I will get back to you as soon as possible!
I’m an outdoor enthusiast and have sported a full beard since I was in my early 20’s. Originally, growing a beard was a way to save time when getting ready each day, but I quickly realized that keeping a neatly trimmed beard takes work and some forethought. That’s where this site comes in.
You get to benefit from my years of experience. I’ve reviewed many of the top hair clippers on the market today and also included some information on what works best for me. A great beard will turn lots of heads in your direction.
Since I never know when I’m going to find myself being photographed, whether it’s climbing in Yosemite, or playing volleyball on the beach, it’s important to me to always look my very best. Maintaining my beard is part of my daily routine and I hope you’ll find some useful tips and information on this site to help you on your journey.
I e been cutting my husbands hair for three years….waiving him time and money!
Watch a few tube videos you’ll be a pro in no time!!